 Switch it on, let it shine Switch it on, let it shine
Set the mood with light devineRecessed, track, low-voltage spot
Are a few of the choices you’ll be taught
If you're like most people, you probably take electricity for granted. It
has become such an integral part of our lives that it's hard to imagine life
without it. From the chargers that power our answering machines to the
fixtures that light up our lives, there's no substitute for a well
thought-out electrical plan to make our lives more convenient and safe.
I also took electricity for granted -- until age three. I discovered the
power of electricity when I stuck my mother's metal hair clip into an outlet
above the bathroom sink. Boom! A blue-white flash exploded in my eyes as the
room fell with blinding darkness. Sporting a pale face and numb hands, I
felt empowered to have caused such a ruckus. It was only after my mother
reprimanded me that I began to understand I had violated a basic principle
of electrical etiquette. "Don't ever play with electricity again," she
commanded. "Only bad boys cause shorts!"
The intensity of the short was so great I remember it partly melted the
plastic faceplate over the outlet. I'll never forget the paralyzing jolt I
felt in my forearm. With one look at the charred receptacle, I was clearly
lucky to have avoided a lethal exercise in auto-electrocution. Despite my
mother's indelible warnings, my fascination with electricity grew only
stronger; it culminated in a career in electrical engineering during which I
caused a great many more shorts, though none quite as memorable as the
first.
If you're building from scratch, you have a lot of flexibility in the way
you wire your house. In the case of remodeling, your choices may be more
limited depending on the extent of the renovation you plan. In either case,
following these basic guidelines will help you install an efficient and
ample electrical service for your current and future needs.
Plan for Power
Most residential electrical services are single-phase 100-200 amps at
120/240 volts. If you're building a new home, put in at least a 200-amp
service. While this won't be enough to power a nuclear reactor in your
garage, it will give you plenty of extra juice should you later decide to
add-on or build a small shop. Only under rare circumstances would you need
more than a 200 amp service for single-family residential construction.
While 320-amp services are available, a 400-amp service is next most-common
increment and can be found in some larger homes (5,000+ square feet).
Of course, the actual size of your service will be based on your electric
load requirements. High amperage users of electricity include:
electric furnaces, electric water heaters, electric ovens and ranges, air
conditioning systems, electric washer and dryer, central vacuums, space
heaters, and pool pumps/heaters.
Go Underground
Another point to consider is whether you can go underground with your new
service. Just because the neighborhood distribution is overhead doesn't mean
your personal hook-up has to be overhead. Depending on the distance of the
service panel from the nearest utility pole, an underground service can be
relatively cost-effective. An underground service is also much safer and
eliminates the unsightly rat's nest of wires draping into a typical home.
While some newer developments feature underground utilities throughout, most
older established neighborhoods still rely on overhead power distribution.
Ask your utility company for guidelines showing you how to provide
underground service to your home. Generally, utility companies will also
coordinate joint trenching with other services. A typical trench contains
three conduits, one for power, another for telephone, and a third for cable.
For safety reasons, gas lines typically reside in a separate trench. Someday
there may be yet another conduit for planned fiber optic networks. These
high-speed networks will bring multi-media alive in your home, combining
computers and television for instant access to movies, databases, and
interactive video conferencing. With cable modems, high-speed DSL services,
it's just a matter of time before you decide to add another high bandwidth
connection to your home.
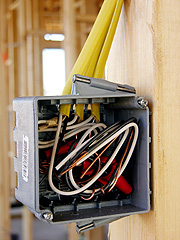
Subpanels
 For convenience, many people prefer an interior subpanel as opposed to an
exterior one. With an interior panel, it's a little easier to make future
electrical repairs since you won't have to walk outside to flip breakers and
recite the famous, "honey, is the light off yet? For convenience, many people prefer an interior subpanel as opposed to an
exterior one. With an interior panel, it's a little easier to make future
electrical repairs since you won't have to walk outside to flip breakers and
recite the famous, "honey, is the light off yet?
An interior panel is also a consideration if you live in areas where a
hike to the breaker box during a rainstorm or blizzard isn't your idea of an
enchanted evening. Of course, if your subpanel is indoors, you need a good
place to put it. You don't want the subpanel in the middle of your living
room wall, right next to Van Gogh's Sunflowers (the replica, of course). The
National Electrical Code (NEC) also prohibits subpanels in closets whose
contents might obstruct emergency access. Subpanels generally shouldn't
penetrate fire walls either, such as the wall separating your garage from
the house.
Let your designer or architect know early on if you want an interior
subpanel so it can be integrated into the overall design. Minimum clearances
are required to provide safe, and easy access for maintenance or repair, so
be sure to check your local codes for the latest requirements.
In larger homes, particularly two-story homes over 3,000 square feet, two
or more subpanels are a good idea. This simplifies the number of long "home
runs" required to main entry panel and may even reduce the overall cost of
your installation in some cases. Even though our home is smaller we
opted for two subpanels. One panel handles the dining room, living
room, breakfast nook, kitchen, guest room/bath, foyer, and zone 1 heater.
The second panel handles the upstairs bedrooms, bathrooms (with whirlpool
spas), laundry room, garage, utility room, central vacuum, zone 2 heater,
and optional air conditioning unit.
To allow ample capacity for future electrical additions, we installed
subpanels with 24 breaker slots each, for a total of 48 breakers. While
we're only using about half the breaker space capacity, extra lines always
come in handy to accommodate lifestyle changes. Allowing for future addition
of more rooms, a sauna, whirlpool, hot-tub, swimming pool, space heater, air
conditioner, or garage shop are just a few of the options to consider when
planning your electrical requirements.
The cost of the larger subpanels is insignificant compared to the cost of
replacing your subpanel should you find it filled to capacity. An
electrician's price for a quality subpanel is about $100, excluding circuit
breakers. A service main is generally more, but depends on size and model.
The way I see it, it's just not worth skimping when it comes to the
electrical service. While the NEC doesn't dictate how you plan for future
expansion, it strongly urges forethought in your electrical plan. Overloaded
subpanels and careless workmanship are responsible for a number of house
fires each year. Besides, when it comes time to sell the house, you can
proudly point out that you left enough capacity in reserve to accommodate a
twelve-room expansion.
Another advantage of having multiple circuits is that you can isolate
different parts of the house more effectively. While this increases the
installation cost of your electrical system slightly (due to additional
home-run feeds), it's nice to be able to switch off the power to the kitchen
lights without affecting the refrigerator. To save money, some electricians
and contractors push the code to limit, putting several rooms on one
circuit. While this arrangement isn't necessarily a safety hazard, you may
experience more frequent circuit tripping. This happens, for example, if you
plug in an electric space heater and a hair dryer into the same branch
circuit, even though the outlets may be in separate rooms. Imagine standing
in front of the bathroom mirror half naked with a towel draped around you.
Pow! Suddenly, turning on the hair dryer blows the breaker. The lights go
out, the bathroom heater dies, and of course, your hair is sopping wet.
Noticing the morning frost crusting the windows, you realize it's times like
these that you wish you had been less stingy with your wiring.
While the physical implementation of your electrical plan is generally
left to the discretion of the contractor (few house plans show a thorough
mapping of the electrical system), it's best to discuss and settle these
issues prior to obtaining bids. Some contractors will bid the minimum
possible to meet the electrical codes. Others may include additional
convenience outlets, switches, and fixture boxes. Because each and every
outlet requires a certain amount of labor, wire, and other materials, the
total electrical cost correlates strongly to the number of electrical boxes
required. Furthermore, for each separate circuit you want, you'll be charged
for a "home run" back to the subpanel, which includes the added cost of the
breaker, wire, and labor. In the extreme case, there's nothing inherently
wrong with putting every room and every major appliance on its own circuit.
The only issue is balancing the benefit against the added price. Because we
did the wiring ourselves, we erred on the side of too many circuits. If we
had subcontracted the wiring, we might have settled for fewer isolated
branches to save money.
Until recently, most convenience outlets and lighting circuits were rated
at 15 amps and used 14-guage wire. Finding this to be inadequate in some
cases (because of excessive voltage drop over long runs), the NEC urges all
new general-service wiring to be 12-guage solid copper with a ground. At the
time of writing, a 250-foot roll of two-wire Romex with a ground was running
about $50, or $0.20/foot. Lower gauge wire (larger diameter) is a good
practice when long distances result in unacceptable voltage drop, or where
additional current carrying capacity is required (such as an electric stove,
oven, or water heater). For best efficiency, no more than a three- to
five-volt drop at full load is acceptable. Table 8 in Chapter 9 of the NEC
shows the voltage drop of copper per thousand feet (MFT) of wire. Remember
that electricity must travel two directions -- to and from the fixture or
outlet. So, don't forget to double the actual distance from the panelboard
to the fixture when computing total voltage drop. Our electric double-oven,
for example, required a dedicated 120/240V 50A circuit. While the maximum
operating current was on the order of 38 amps, the expected voltage drop for
a fifty-foot run of 6-guage Romex (100 feet round-trip) was roughly 2 volts
-- well within acceptable limits. The biggest surprise, though, was that the
hunk of copper cable right off the reel cost over $100. Add to that the dual
50-amp circuit breaker, labor, and an oven junction box, and you quickly
realize it costs about $300 just to supply power to the oven. Add to that
the separate circuits for other appliances such as dishwashers, compactors,
cooktops, and garbage disposals, it's easy to see how the kitchen is one of
the most expensive parts of the house wiring. With the price of copper
continually in flux, it's no wonder the wire alone for a three- or
four-bedroom house runs between $1,000 - $2,000.
Today, certain circuits must be rated at 20 amps. Kitchens, breakfast
nooks, and dining rooms must be supplied with no fewer than two 20-amp
branch circuits. This ensures that multiple appliances such as a toaster,
blender, and microwave oven can all operate simultaneously without
overloading the circuit. A quick look at the proliferation of electrical
gadgets in the kitchen make this NEC ruling a wise move.
In general, the NEC requires outlets to be spaced no more than 12' apart
as measured along any part of the wall. Walls or partitions 24" or greater
must have at least one outlet, such as between two adjacent doors. Kitchen
peninsulas and islands also require electrical outlets, appropriately
spaced. The intent of the code is to minimize the use of extension cords
where they might interfere with the flow of traffic or where the cords would
be in excess of 6'.
As you envision each room, consider where you might want additional
outlets. In bedrooms, you may want outlets behind each nightstand to make it
easy to plug in clocks, reading lamps, or electric blankets. In a study or
office, you may want several outlets located near the desk to allow for a
computer, printer, fax machine, and answering machine. In areas that were
likely to be near a desk, we added double duplex outlets (quadraplex). That
means we can plug in up to four gadgets without the need for a separate
power strip. Surge-protected outlets are even available to protect sensitive
electronic equipment in the event of a power surge. With the proliferation
of electronic goodies in our homes, it's hard to put in too many outlets
these days. It always seems you could use a few extras here and there.
When specifying outlets, note that all outlets are not the same. What's
the difference, then, between a basic fifty-cent outlet and one that costs
six dollars? Quality, for one thing. Commercial or industrial-grade outlets
have superior construction. Generally, the body is reinforced with a heavy
metal grounding strap that wraps around the entire unit. This provides
excellent structural and flexural stability when subjected to repeated
insertions and withdrawals. Furthermore, the electrical contacts are
generally of the "double-wipe" variety, providing added assurance of a sound
electrical connection even after repeated abuse. While not every outlet
needs to be of the commercial-grade type, consider using these in areas
subjected to heavy use or where corrosive gases or moisture conditions may
persist, such as in kitchens, garages, bathrooms, and laundry rooms. Often,
manufacturers refer to these high-quality outlets as spec-grade,
spec-master, or industrial-grade. Since these words mean different things to
different manufacturers, be sure to check the actual specifications of the
outlets before you spend the extra money.
In general, stay away from the very top-of-the-line outlets that have a
green dot on the face. These are called Hospital Grade outlets and are way
overkill for most residential applications. However, just as
Hospital-Grade outlets are ideally suited for hospitals where excellent wear
resistance, structural integrity and safety are high priorities, they are
equally well suited for any applications where a high-abuse,
high-performance outlet is required. Hospital-grade outlets carry huge price
premiums, costing anywhere from ten to thirty dollars or more depending on
the brand and model. To improve impact resistance and resistance to
chemicals, hospital-grade and premium industrial-grade outlets are made from
nylon, instead of thermoplastic. Nylon faceplates are also available to
match, although with fewer switchplate combinations from which to choose.
Locating Switches
 Consider also the location of switches. For example, in a two-story
house, you might want to control the entryway chandelier from the front door
and again at the top of the stairs. In your bedroom, you might want to
switch the lights on at arm's length from your bed. This forethought and
attention to detail makes the difference between a basic electrical plan and
one that really works for you. Consider also the location of switches. For example, in a two-story
house, you might want to control the entryway chandelier from the front door
and again at the top of the stairs. In your bedroom, you might want to
switch the lights on at arm's length from your bed. This forethought and
attention to detail makes the difference between a basic electrical plan and
one that really works for you.
Switch height is another factor to consider. Typically, switches
are set between 42" and 48" above the finish floor surface. However,
if you want small children to be able to reach the switches -- or you have
an occupant confined to wheelchair, switches should be set lower, such as
36" from the finish floor. Of course, in the kitchen area, switches
and receptacles should be set at the same height along along countertops.
Since the top of most kitchen counters is roughly 36" and there is typically
about 18" between the top of the counter and the bottom of the wall
cabinets, 42" - 43" is a good center line for setting receptacles and
switches in kitchens.
Three-way and Four-way Switches
Despite the confusing name, a three-way switch lets you turn a light on
or off from two different locations. A four-way switch together with two
three-way switches let you control a light from three places. Only rarely
would you need to control a light from four or more locations, but this is
also possible by combining additional four-way switches with two three-way
switches. In retrofit applications and in new construction, Leviton (www.leviton.com)
among others make a line of electronically controlled switches, dimmers, and
outlets. By replacing existing switches and outlets with retrofittable
controllers and receivers, you can control any outlet or light from any
switch in the house. This is a cost-effective way to go in some retrofit
applications where rewiring would be difficult or cost-prohibitive. Because
electronic switches require minute amounts of current to operate, a white
neutral connection is also required. For retrofit applications, you'll
generally find a white neutral passthrough splice in all switch boxes. An
end-of-the-run three-way switch, however, does not have a true neutral, even
though there may be a white wire present. This white wire should really have
a piece of black tape on the lead to show it’s merely one leg of the hot
switch loop.
The look, quality, and color of switches and outlets also affect the
total cost of the installation. A basic ivory duplex outlet and single-pole
switch cost about fifty cents apiece. The same switch in a three-way variety
is likely to cost three to four times the price. A white or decorator gray
Decora outlet or switch from Leviton or any number of other manufacturers
costs several dollars on up. Lighted switches come in handy when you might
have to fumble for the switch in total darkness. Silent (also called quiet)
AC switches eliminate the harsh clicking sound of some cheaper switches. In
less expensive mechanisms, you can hear the electricity crackle as the
switch makes contact. I don't like these switches. The crackling noise seems
like a hazard, even though it probably isn't. If you're really into a
smooth-action switch with no contacts to wear out, try some of the newer
sealed mercury switches. As you move the trip level, a pool of mercury rolls
down a small tube, making contact as it moves.
For the designer-conscious residents, faceplates and colors have come a
long way. Until recently, about the only colors available were ivory and
black. In the past few years, white and gray have become common, as well as
designer colors from specialty manufacturers. You can also find brass,
chrome, glass, wood, or ceramic faceplates. You can even order faceplates
made of Corian to match your countertops. White switches with gray-granite
Corian faceplates look sexy in a modern kitchen. But expect to pay up to ten
dollars for some of the more exotic faceplates. Some manufacturers now offer
switch/faceplate combinations with no face screws. These offer a clean,
sleek look. But they may lock you into a specific manufacturer's hardware.
In general, go with standard stuff. You can be sure it'll be around for
years to come and it'll be easier to find matching replacement parts should
something break.
A Thousand Points of Light - Recessed Lighting
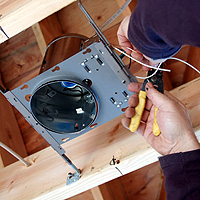 One of the more popular trends in recent years has been recessed
lighting. Used for years in commercial and industrial applications, recessed
lighting has taken the residential remodeling and new construction market by
storm. Several manufacturers offer recessed lighting fixtures, including
Edison, Halo, and Lightolier to name a few. After comparing several brands,
we chose Lightolier recessed fixtures because of the overall styling,
flexibility, and quality fabrication. While Lightolier is sometimes harder
to obtain than Halo, for example, any reputable brand will provide good
overall performance. Be sure that any brand you use has a UL approval.
Recessed lights -- especially parabolic reflector flood (PAR) -- can
generate a tremendous amount of radiant heat. As with any electrical device,
proper installation is essential if safety is to be maintained. Unless
specifically marked for direct burial in insulation, all insulation must be
at least 3" away from the fixture. In no circumstances should insulation be
placed above the fixture. This creates a fire-hazard condition that is
unsafe and could pose a serious danger. One of the more popular trends in recent years has been recessed
lighting. Used for years in commercial and industrial applications, recessed
lighting has taken the residential remodeling and new construction market by
storm. Several manufacturers offer recessed lighting fixtures, including
Edison, Halo, and Lightolier to name a few. After comparing several brands,
we chose Lightolier recessed fixtures because of the overall styling,
flexibility, and quality fabrication. While Lightolier is sometimes harder
to obtain than Halo, for example, any reputable brand will provide good
overall performance. Be sure that any brand you use has a UL approval.
Recessed lights -- especially parabolic reflector flood (PAR) -- can
generate a tremendous amount of radiant heat. As with any electrical device,
proper installation is essential if safety is to be maintained. Unless
specifically marked for direct burial in insulation, all insulation must be
at least 3" away from the fixture. In no circumstances should insulation be
placed above the fixture. This creates a fire-hazard condition that is
unsafe and could pose a serious danger.
Designing an effective lighting plan doesn't happen by chance. Just like
all other phases of home construction, effective lighting requires the
specialized skills of a lighting designer. Often, reputable lighting stores
provide this service free of charge (in exchange for buying the fixtures at
that store). While it doesn't take a rocket scientist to design a good
lighting plan, there are a number of basic design guidelines based on the
required light levels, ceiling height, surface reflectivity, lamp type, and
fixture type.
Wiring for the Future
We live in an exciting time. Almost daily we read of new developments in
video, communications, and home entertainment services. Making sense of
these new developments is a dizzying task. Since it is impossible to predict
what the future will bear, the easiest way to future-proof your home is to
provide a 3/4" conduit from a central location (phone closet) to key
locations throughout your home. This applies to telecommunications and
cable, as well as future computer networking connections. While this sounds
excessive, consider that today many households have more than one computer.
Wouldn't it be nice if all the computers could share the same printer, fax
machine, scanner, and Internet service provider? With networking, this is
possible. This way, if someday your cable is replaced by fiber optics, it's
easy to remove the old and install the new.
If you do set aside a central area for making these connections, provide
also AC power to the general area. This will come in handy for
powering CATV amplifiers, active splitters, LAN hubs, or specialty
communications systems of the future. |